
February 20, 2022
A Vercel-like PaaS beyond Jamstack with Kubernetes and GitOps, part I
Cluster setup
This article is the first part of the A Vercel-like PaaS beyond Jamstack with Kubernetes and GitOps series.
A Vercel-like PaaS beyond Jamstack with Kubernetes and GitOps
- Introduction: Some reasons to build a PaaS with Kubernetes and GitOps practices
- Part I: Cluster setup
- Part II: Gitlab pipeline and CI/CD configuration
- Part III: Applications and the Dockerfile
- Part IV: Kubernetes manifests
- Caveats and improvements to a PaaS built with Kubernetes and GitOps practices
As told in the introduction, this part is about building a cheap, easy to rebuild Kubernetes cluster to get the ball rolling. I'd like to test things on a bare setup before using managed clusters such as AKS, EKS, GKE, etc.
- Start a fresh server
- Install k0s
- Install Lens and add k0s cluster
- Add cert-manager and nginx-ingress-controller
- An overview of how network traffic flows
- Next step
To run this setup I need a Linux system with at least 2 GB of RAM 1, and a little more than the default 8 GB of disk space to make sure logs won't fill up all the available space. This is definitely not ideal but my goal here is to build a cheap setup.
I also need a wildcard subdomain pointing to this server. I'm using *.k0s.gaudi.sh.
My server setup is:
- 2GB RAM
- 2 vCPUs
- 16GB disk
- Ubuntu 20.04
1. Start a fresh server
k0s can run on any server from any cloud provider as long as it can run a Linux distribution that is running either a Systemd or OpenRC init system.
AWS is my go-to provider, but going with any other cloud service provider shouldn't be a problem.
All aws commands I'm running on my workstation can be executed from AWS CloudShell
or performed from the web Management Console.
First, I launch a t3.small EC2 instance running Ubuntu 20.04.
I'm providing my SSH key with the --key-name flag, and I'm attaching
my EC2 instance to an existing security group that allows TCP traffic on ports
22, 80, 443 and 6443:
aws ec2 run-instances \--image-id ami-04505e74c0741db8d \--count 1 \--instance-type t3.small \--key-name k0s \--block-device-mappings \'DeviceName=/dev/sda1,Ebs={VolumeSize=16}' \--security-group-ids sg-4327b00b \--tag-specifications \'ResourceType=instance,Tags=[{Key=project,Value=k0sTest}]'
When I want to clean up everything and shutdown created instances, I use the
--tag-specifications provided above to select instances and terminate them:
# store running instances ids in a variableINSTANCES=`aws ec2 describe-instances \--query \Reservations[*].Instances[*].[InstanceId] \--filters \Name=tag:project,Values=k0sTest \Name=instance-state-name,Values=running \--output text`# delete instancesaws ec2 terminate-instances --instance-ids $INSTANCES
Configure a DNS record to point a wildcard subdomain to the server
Since I'm using AWS Route53, I've made a script to speed up the operation.
I'm using it as follows to update the existing A record:
HOSTED_ZONE_ID=`aws route53 list-hosted-zones \--query HostedZones[*].[Id,Name] \--output text \| grep gaudi.sh | awk '{ print $1}'`K0S_IP=`aws ec2 describe-instances \--query \Reservations[*].Instances[*].PublicIpAddress \--filters \Name=tag:project,Values=k0sTest \Name=instance-state-name,Values=running \--output text`curl -sSlf https://gist.githubusercontent.com/jexperton/9051676d7b2747f080cd193198e18091/raw/1686b13e09431cd98baf027577d20da572b880df/updateRoute53.sh \| bash -s -- ${HOSTED_ZONE_ID} '\\052.k0s.gaudi.sh.' ${K0S_IP}
Now, any subdomain ending with .k0s.gaudi.sh, such as abcd1234.k0s.gaudi.sh,
will be routed to my EC2 instance.
This way I don't have to add a new CNAME record each time I create.
2. Install k0s
The $K0S_IP variable has already been set in section 1 and contains the server's
IP address.
The private key I've attached to the server is in my Downloads folders and I use it to ssh to the server:
$ ssh -i ~/Downloads/k0s.pem ubuntu@$K0S_IPWelcome to Ubuntu 20.04.3 LTS (GNU/Linux 5.11.0-1022-aws x86_64)...
Once I'm connected to the EC2 instance, I can download the k0s binary and create a cluster configuration file:
# download k0s binary file:curl -sSLf https://get.k0s.sh | sudo K0S_VERSION=v1.23.3+k0s.0 sh# generate a default config file:sudo k0s config create > k0s.yaml# replace 127.0.0.1 with server's public ip# to grant access from the outsidePUBLIC_IP=`curl -s ifconfig.me`sed -i 's/^\( sans\:\)/\1\n - '$PUBLIC_IP'/g' k0s.yaml
The configuration file has been generated and I've replaced the EC2 instance's
private IP address with its public IP address with the sed command to expose
the Kubernetes API to the internet.
It's not a good practice, and in real life I'd prefer to use AWS VPN or my own OpenVPN setup to join the EC2 instance's network and query the Kubernetes API from the internal network.
Now, I can install a single node cluster:
$ sudo k0s install controller --single -c k0s.yaml$ sudo k0s start# wait a few seconds then:$ sudo k0s statusVersion: v1.23.3+k0s.0Process ID: 3606Role: controllerWorkloads: trueSingleNode: true# wait a minute then check if control-plane is up:$ sudo k0s kubectl get nodesNo resources found# not ready yet, wait and retry:$ sudo k0s kubectl get nodesNAME STATUS ROLES AGE VERSIONip-172-31-13-250 Ready control-plane 5s v1.23.3+k0s
The k0s cluster is now up and running. I check the server resources status to confirm it's not overloaded:

3. Install Lens and connect to k0s cluster
Lens is a graphical UI for kubectl, it makes interacting with a cluster easier and debugging faster for me.
Once I've installed Lens, I skip the subscription process and add the cluster from File > Add ClusterFrom menu. It shows an input field where I can paste a user configuration.
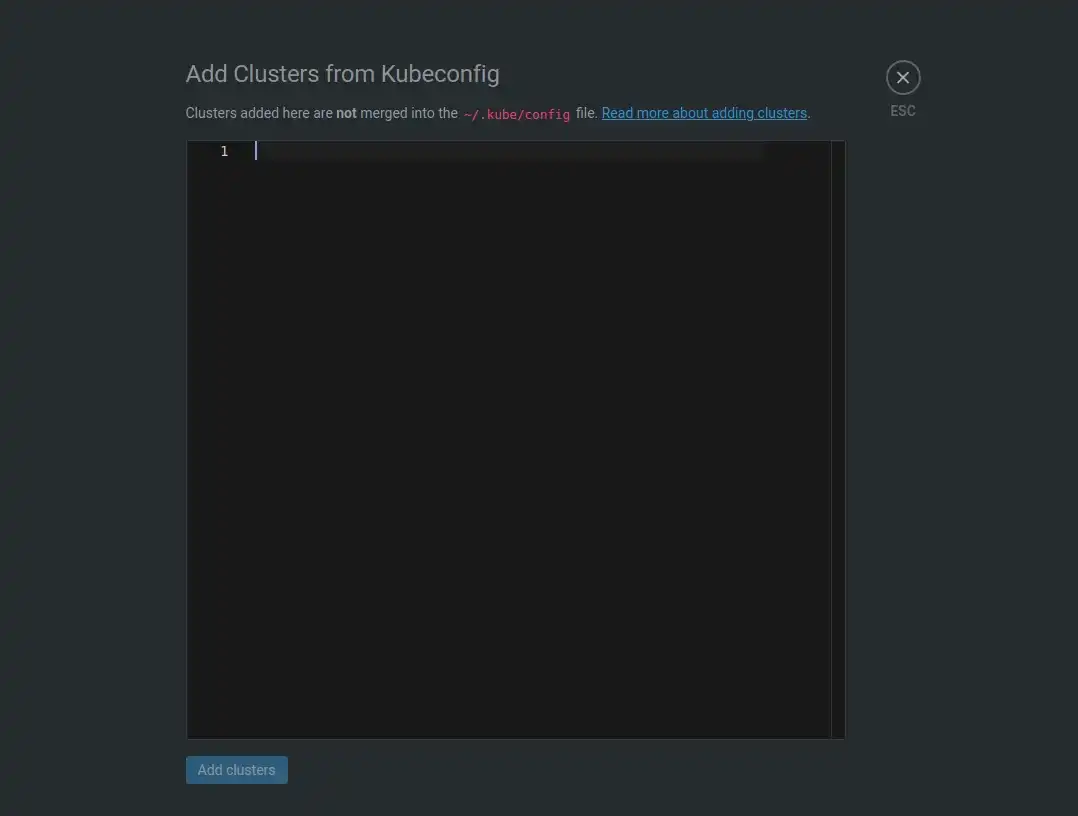
Adding a new cluster to Lens
To get these credentials I go back to the server, then copy the whole yaml output of this command, and paste it in Lens:
$ sudo k0s kubeconfig admin \| sed 's/'$(ip r | grep default | awk '{ print $9}')'/'$(curl -s ifconfig.me)'/g'WARN[2022-02-05 18:49:43] no config file given, using defaultsapiVersion: v1clusters:- cluster:server: https://3.224.127.184:6443certificate-authority-data: LS0tLS1CRUdJTiBDRVJUS...name: localcontexts:- context:cluster: localnamespace: defaultuser: username: Defaultcurrent-context: Defaultkind: Configpreferences: {}users:- name: useruser:client-certificate-data: LS0tLS1CRUdJTiBDRVJUSUZJQ0...client-key-data: LS0tLS1CRUdJTiBSU0EgUFJJVkFURSBLRV...
Now I'm able to connect to the cluster and show an overview of the workload in all namespaces:
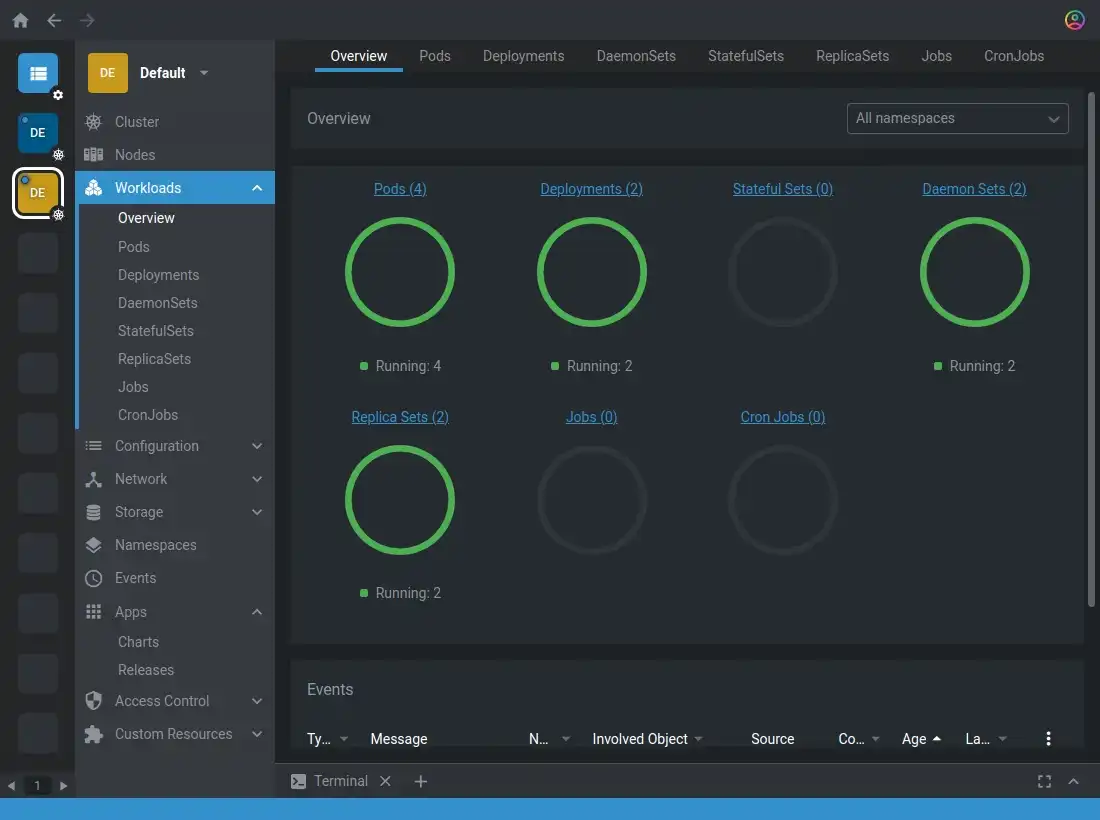
Lens overview of the new cluster
4. Add nginx-ingress-nginx and cert-manager
To install third-party application I use Helm, and for simplicity I'm using Lens to interact with Helm instead of the command line.
The first thing I do is to install ingress-nginx to route custom URLs to the appropriate pods. Then, I install cert-manager to handle TLS certificate generation with Let's Encrypt.
Install ingress-nginx
From the Apps > Charts tab, I search ingress-nginx by ingress-nginx:
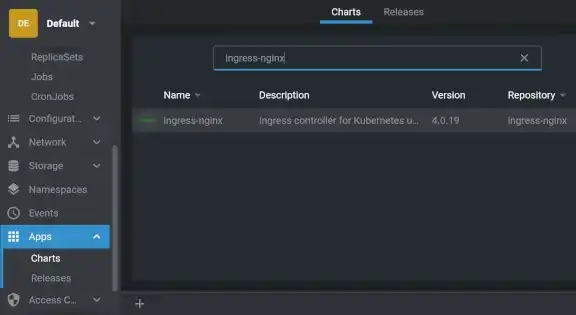
Searching ingress-nginx in chart list
In the yaml configuration, I'm setting hostNetwork to true to bind ingress to
80 and 443 host's port then click Install:
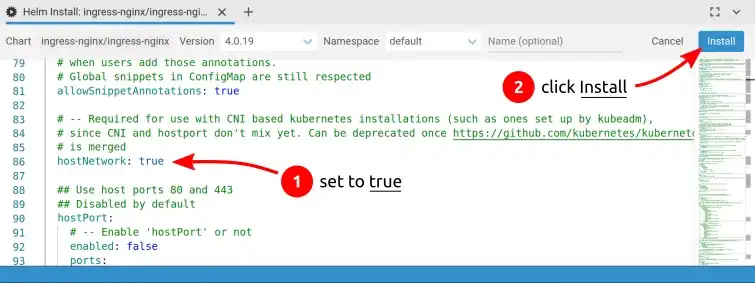
Installing ingress-nginx chart
This configuration is not recommended but it's an easy way to address the lack of a load balancer in front of the cluster.
Install cert-manager
From Lens, I go to Apps > Charts, and I search for cert-manager by Jetstack.
I select version 1.6.3 and click Install. It opens the yaml config, where
I enable CRDs
installation by switching installCRDs to true in the yaml config:
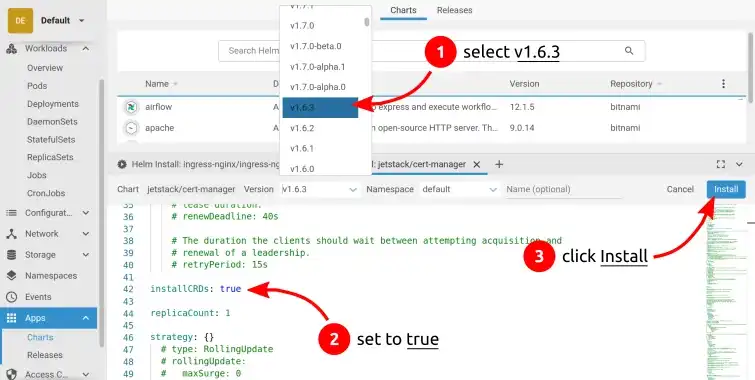
Installing cert-manager chart
Once installation as finished, I run the following command from the k0s server to add a new certificate issuer:
cat <<EOF | sudo k0s kubectl apply -f -apiVersion: cert-manager.io/v1kind: ClusterIssuermetadata:name: letsencryptspec:acme:email: n0reply@n0wh3r3.comserver: https://acme-v02.api.letsencrypt.org/directoryprivateKeySecretRef:name: letsencryptsolvers:- http01:ingress:class: nginxEOF
The email address I'm providing here will receive all the Let's Encrypt expiration notices. It can get annoying and for that reason I'm using a fake one.
Resource check
Note that 1 GB of RAM is already filled up, so it definitely takes at least a 2 GB.
Also 4 GB of disk space already filled up, so 16 GB is recommended:
$ df -hFilesystem Size Used Avail Use% Mounted on/dev/root 16G 3.9G 12G 25% /
An overview of how incoming traffic flows
Because I've set hostNetwork to true when installing ingress-nginx, it has
created the following Kubernetes endpoint:
$ sudo k0s kubectl -n default get endpointsNAME ENDPOINTS AGEingress-nginx-...-controller 172.31.12.80:443,172.31.12.80:80 2h
It allows the host's incoming HTTP and HTTPS traffic to be forwared to the cluster, and more specifically, to this pod (more on this in part IV):
$ kubectl get pod -A -l app.kubernetes.io/name=ingress-nginxNAMESPACE NAME READY STATUS RESTARTS AGEdefault ingress-nginx-164... 1/1 Running 0 1d
The diagram below shows how incoming traffic flows throught components. Now that I've configured the cluster, so far I've set up the first three steps:
✓ 1.client DNS ok and 443/TCP port open↓✓ 2.host k0s installed↓✓ 3.ingress ingress-nginx installed↓4.service↓5.pod↓6.container↓7.application
Next step
My cluster is now ready 2 to host applications. In the next parts, I'll show how to automate the deployment of any branch or any commit of a repository from Gitlab CI/CD, generate a unique URL à la Vercel and promote any deployment to production.
1 I tried with a t2.micro with 1 GB of RAM which can be run for free as part of the AWS Free Tier offer and fits the minimal system requirements of k0s for a controller+worker node, but it ended up being pretty unstable. ↑
2 Ready for testing, there's a lot to say about this setup but it's not meant to be a permanent solution. See in afterward. ↑
